Gluten Free Chocolate Cake
This Gluten Free Chocolate Cake is one of the easiest gluten free cakes to make.
It is a versatile gluten free treat. Enjoy a tasty slice with your morning coffee or afternoon tea. It is a family favourite for birthday and celebration cakes, enjoyed equally by those who need gluten free food and those that don’t.
This gluten free chocolate cake recipe is easy to follow and includes different decoration tips which you can find at the bottom of this page. There are also notes on how to adapt it to be lactose free.
Ingredients
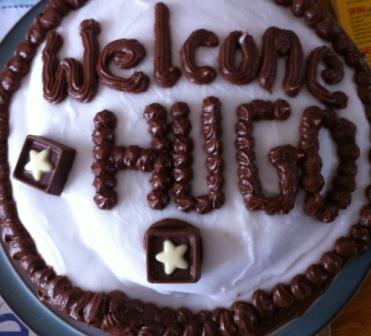
These ingredients will make the gluten free chocolate cake shown in the picture, one large 8” cake.
To make a smaller cake you can simply halve these quantities. For example use 5 oz (150g) of butter, 5 oz (150g) sugar, 3 eggs etc.
For the cake
10 ¼ oz (300g) butter or vegetable spread* (my favourite is sunflower spread).
10 ¼ oz (300g) sugar
6 Eggs
10 ¼ oz (300g) self raising gluten free flour
2 ½ ozs (60g) cocoa powder
Milk**
For the chocolate butter icing
4 oz (115g) butter or vegetable spread*
9 ¼ oz (275g) icing sugar
1 ¼ oz (30g) cocoa powder
Jam (raspberry or strawberry jam are particularly good with chocolate cake)
For the water icing to decorate the top
8 oz (225g) icing sugar
Cold water
Lactose free version
* To make a lactose free and gluten free chocolate cake, make sure you use a vegetable spread that specifies that it is dairy and lactose free. Some vegetable spreads include buttermilk making them unsuitable for those who are lactose intolerant.
** To make a lactose free and gluten free chocolate cake, replace the milk with cold black tea or natural fruit juice.
Method - cake
- Pre heat oven 350⁰F, 180⁰C (160⁰C fan oven).
- Line cake tin with baking parchment or grease bottom and sides of cake tin with extra butter/vegetable spread*.
- Mix the sugar and butter/vegetable spread*. If you are using butter make sure it is at room temperature otherwise it may be too hard to mix.
- Sieve the flour and cocoa powder together.
- Add 3 eggs and half the sieved flour/cocoa to the sugar and butter mixture and mix well.
- Add the remaining eggs and flour/cocoa and mix well making sure all the ingredients are blended together.
- Add small quantity of milk** enough to make the mixture sloppy but not so much that it starts to separate. If it does separate simply add a little bit more flour or cocoa powder until it comes together again.
- Pour mixture into tin and place in the oven.
- Bake for 50 minutes, test cake with a cake tester. The cake is ready when the top is firm to the touch and the tester comes out clean. The cooking time can vary for different ovens.
- Carefully remove your gluten free chocolate cake from the tin and allow to cool.
Method - icing
1. To make the chocolate butter icing:
- sieve the icing sugar and cocoa powder together.
- Add it to the butter/vegetable spread* a little at a time until all the dry ingredients have been added and it is thoroughly mixed.
- Put roughly ¼ of the mixture into a piping bag. The remainder will be used to fill the cake.
2. To make the water icing for the top:
- sieve the icing sugar and add cold water a little at a time until you get the required consistency.
- I like something reasonably thick as it is easier to control when spreading on top of the cake. However some people prefer thinner icing.
Decorating the cake
- Cut your gluten free chocolate cake in half horizontally.
- Spread the jam and ¾ of the chocolate butter cream filling into the middle and sandwich together.
- Spread the water icing on the top.
- Using the remaining chocolate butter icing pipe the words and design required.
Additional decorating ideas
- Replace the jam filling with fresh fruit and use some of the fresh fruit to decorate the top. You can also replace the butter icing filling with freshly whipped cream.
- Use the chocolate butter icing to decorate the top of your cake. All you need to do it make twice the quantity of the chocolate butter cream filling and use half to fill the cake and spread the other half on the top.


Welcome!
I'm Janne. I create recipes and provide tips for enjoying fantastic food that just happens to be gluten free.
Whether you are living gluten free full-time, trying it out or cooking occasionally for family and friends.
This is gluten free for foodies.


Never miss a recipe!
Subscribe to my FREE Newsletter!
New! Comments
Have your say about what you just read! Leave us a comment in the box below.